Thursday, 15 May 2014

Jetseer conversion part 1: gluenado

I hear lots of opinion about how GW are moving toward having a range of models that matches exactly the items in the codex in order to push out third party manufacturers.  That doesn't seem to have stretched to farseers (or warlocks) on jetbikes. Which  is fine by me, since there's very little in my collection that is made from current, out-of-the-box, un-modded, GW produced plastic.

I've seen lots of really great conversions and I was going to do something similar, splicing and grafting a cloak onto a jetbike rider, swapping heads and arms, etc., or possibly modelling a cloak with greenstuff.  But then the voice of Edna Mode came to me: NO CAPES!  This is a jetbike, flying at breakneck speed through a battle zone.  You don't want to be hurtling round a corner only to get tangled up on some spiky chaos adornments.

So, I get a guy in a close-fitting bodysuit, like the usual jetbike riders, give him a farseer head and an arm holding a spear. But he doesn't look like an HQ choice.  He looks like a windrider at fancy dress.

Instead, I thought, why not make the jetbike special instead?  I actually like Eldar jetbikes.  I think for the same reason I love the metal wraithlords: I had one as a kid. I may still have my harlequin jetbike somewhere. If I ever find it and scrape off the half-dozen layered paint schemes I lavished on it, I'll use it for a jetbike warlock. I wanted something special but still in keeping.

What I came up with was part vyper, part jetbike, with a sprinkling of wave-serpent and war walker bits.

The back end is a pair of wings and seat from a vyper with the enormous footplate bit removed, the  seat trimmed down and a jetbike front and shuriken catapult added.

  Then: fins, lots of fins.


There's a little gap either side of the seat that was annoying. It was obviously missing a part.

I found a bit in my box that fit, but needed another one.  It was an arm shield from the new plastic wraithguard. I don't own any, so it must have come in one of the bunches of bits I'd bought on ebay when I was looking for jetbike parts to build my squadron. Reddit helped me find the source and http://megabitzshop.com/ supplied the missing piece.


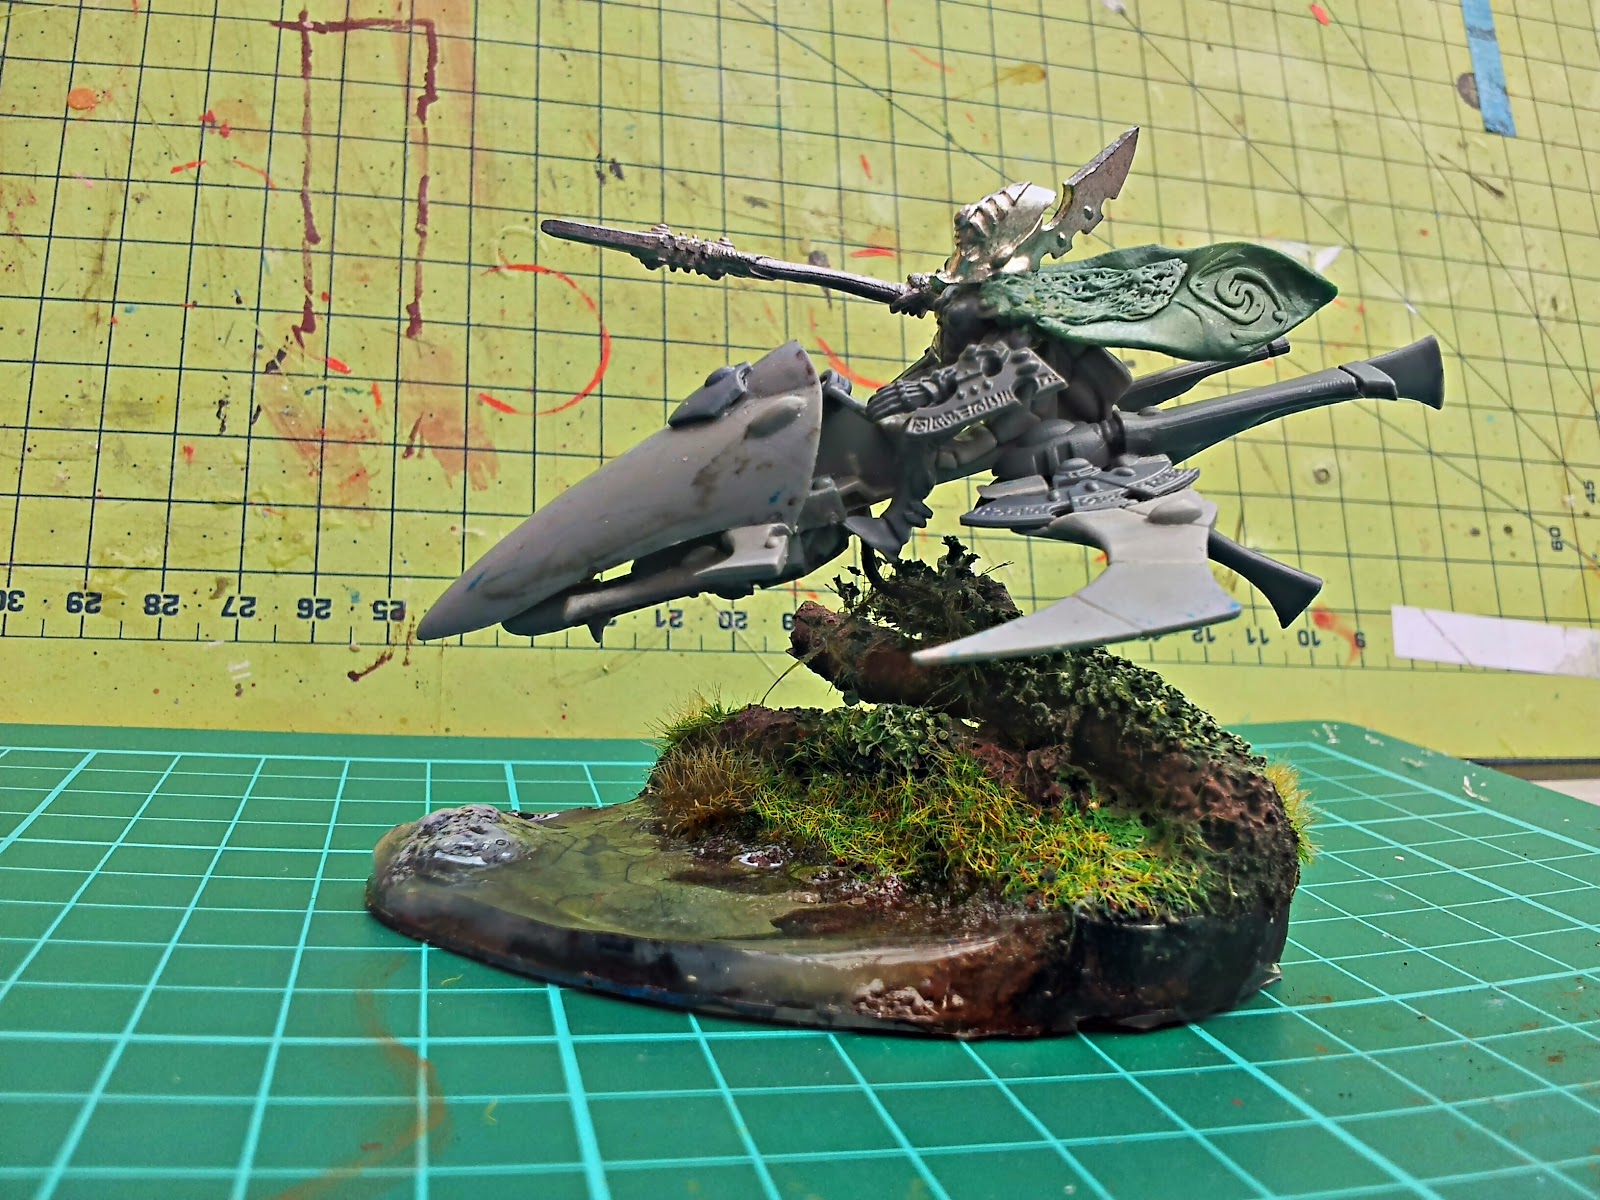
The rider is made from a guardian torso and legs, with arms from my bits-box and a metal farseer head I had in there.  If for nothing more than to hide where I trimmed the excessive shoulder pads, I decided a little cape was OK and created one from greenstuff. It's a fur over a cloak and although I don't think it's technically possible to stretch the definition of "mantle" to cover it, it's my "mantle of the laughing god" if anyone asks,

The base is documented in: this post and this post.

Wednesday, 7 May 2014

Jetseer base, continued

After getting the colours how I wanted them (see the previous post) I gave it a coat of matte varnish and added some static grass and Army Painter tufts.

Now time for water.  I used clear tape to build a temporary wall around the base.


The scenic water seeps through gaps (bitter experience)  so I went around the underside join with thick PVA and allowed it to dry before going any further.


A thin layer of scenic water was added and then it's a matter of waiting.

It took a couple of days to cure fully and unfortunately there were a couple of strange holes in the finish, so I decided to add a second thin layer of water to fill the gaps.


And here it is. Surface tension pulled the edges up, so I trimmed them with a sharp knife. I'm pretty pleased with how this turned out.  The jetbike and seer still need painting, so that's next on the list. I think I might use some masking tape to get a nice clean black ridge along the bottom to tidy up and make it look finished.


Thursday, 24 April 2014

Jetseer base

So, my jetseer needed a base, too.  I really wanted to make something special since I've been taking so much time on the mini itself.

I decided to make a base with some greenery and some water.  Water because I've been wanting to try making a water base.  Greenery because I found some great twigs with lichen on them.

The base is cut from a spare top from my growing collection of Poundland drawers. Here  are the drawers in the middle of my organised chaos.

They come in packs, but the tops come off so you can make taller towers.  I have a bunch of spare tops and I use them as little trays, but I realised that they are also a source of sheet plastic.
I took a corner so that I could use the ridge to help build height and as something to anchor the wire that supports the jetbike.

Here's the piece:
And with a wire and lichen-ey twig...

 Trying out the jetbike on the suppoort...
Next, I added some plaster rocks. I made a batch of these a while ago using some plaster moulds. I only needed a few back then, but made enough to last for a few projects. I filled in around the rocks with air-drying clay and pressed in some smaller rocks.


The idea is that the ground will slope down to the water and the water will stretch to the edge of the base. See how I used clay to extend the twig into the ground?  I was chuffed with how that turned out.

Now for gravel, sand and flock.


Happy with the shape, composition and texture, I gave everything a spray of thin PVA, let that dry and then a coat of spray varnish.  I like the lichen, but don't want it squidgy, or changing shape with heat or moisture. Once everything was encased in PVA and varnish for good measure, it all got a coat of black primer.

And now the colours start coming back by getting painted on. This was all airbrushed. I made sure to have a black shadow where the log and ground met, to enhance the depth. I think it worked well.

And drybrushing...

Next I need to add the static grass and water. I'll report on that soon.


After a long spring term...

Another burst of progress.  The swooping hawks are nearly completely painted.  (Photos to come) Lots of things have been primed, some even have base colours on.

The wraithlord has colour, but needs a wash and detail.

I have some warp spiders that need painting:
I've also primed all of my deadzone stuff now, minis and scenery.  

Monday, 23 December 2013

A sudden surge of progress

I finished work a few days ago for Christmas and I've been hobbying like mad.

I've built another wraithlord, complete with another full set of magnetised weapon options.  This one's jogging into battle.

Here's the second one with the arms of the first:
 And here's the first one, with the arms from the second:
The plastic arms from wraithlord 1 are on here for now because they can be posed better than the weighty metal ones, but they're all fully interchangeable. I've loved these metal Eldar dreads since I was a kid. I have more bits of them in my bitsbox, so I might get around to another at some point.

I wasn't sure how to basecoat all of the weapons easily since they're all small and I didn't want to have to do them in two halves, so I build a little rack with non-ferrous wire and then added a couple of lines of steel wire for them to stick to.

I also finally basecoated a section of fence we've had built for ages and some resin crates.


I made some objective markers from air-drying clay and Wilkinson Christmas decorations (£2 well spent).  They need painting, but I like how they look so far.


And I'm finally ready to start paining my Swooping Hawks.  I spent a long time posing these guys to make each one as different as possible with the small number of poses available, so a squad of 10 doesn't look to repetitious. They're the metal ones everyone seems to want to get rid of. I added wings made from trimmed "wing pendants" bought for a couple of quid on e-bay. I've basecoated them with Army Painter Crystal Blue, ready for shading and detailing.


And finally, I've been painting the sniper model from Deadzone.  Santa is bringing me the prerelease box for Christmas, but I picked this model up so I had something to paint in the meantime.


Now I think about it, I really don't know why I thought I was short on things needing to be done. Everything in this post is half done and needs work.  I also have built the last of the young Nephilim from the Lilith Malifaux starter box I bought ages ago, basecoated and washed another squad of Eldar Guardians, picked up a whole bunch of jetbikes that need stripping, fixing, converting and painting, started working on two Eldar heavy weapon platforms using a mix of the too-small metal weapon platform bases with over-sized mega weapons from wraithknights (I think, I have lots of random bits).

Here's the tray of stuff needing a basecoat:


I made a couple of 2'x2' boards which have been worked on since the photo below, but are still very much unfinished, too.


I'm also scratch-building a Deff Dread for my son's Ork army. I'm probably going to burn out and go back to writing code instead soon, but hopefully I can actually call some of these complete before then.  

Monday, 3 June 2013

ScrapDar progress

My big Eldar-army-from-scrap scheme is starting well.  I've completed a small unit of striking scorpions and a mixed metal/plastic wraithlord.  Now I want rangers.

The thing is, I really don't like Eldar heads and the ranger models have bare heads (and knee-high leather boots, for some eason: have a look).  I like Eldar helmets, though.  So, I decided to build something a bit different rather than trying to find rangers on ebay.

Nobody likes swooping hawks, it sees.  You can get them quite cheap.  I got some metal hawks for a couple of quid. I don't want the wings, but the poses are great and really flowing.  I've bent legs and reposed them, sometimes adding something they're leaning on - like catalogue models, maybe. 

I then snipped of the barrels of their guns and made them into sniper rifles with nice long barrels.  I'm quite proud of those guns.  I drilled into the stock and put in a pin.  Then I put the pin into the copper tube and glued it.  The aluminium tube was then cut to make the thicker parts of the barrel.  

And I did it all with a mostly blunt razor saw.  I need to find some blades.


Next I wanted to make them look like sneaky snipers.  So I made them fabulous capes.  I mean, camouflage cloaks.  This was quite fun. I squashed some air-drying clay into mesh material to make sheets of flexible clay that stayed whole and bent up like material when compressed.  The mesh was once wrapped around some flowers from Tesco.  I also pressed some designs into the bottoms of some of the cloaks.
I then shaped this around the model to look like it was draped around them or concealment (like this guy creeping up steps) or flying out behind them as they run  (the ones leaning forward in a dash, thanks to their previous existence as Swooping Hawks).

Cotton to hold everything in place while it dries.


 Here's another.  I curled the bottom up on this one later and made it look like it was caught in the wind. Like a lethal Marilyn Monroe,


And here they are, looking all around for threats and showing of their cloaks.  I resisted the urge to add a cloak to all of them.  It was so fun to do, but I don't want a squad of people pretending to be superman.

I'm priming them for painting right now.  I'm going to go for a grey/blue/black camouflag-ish colouring, I think.

Friday, 31 May 2013

Hill progress

I've been quiet for a while due to the volume of work lately, but although I haven't been posting, I have made some progress on the hobby.

First, the poundland hill.  We got some small rocks on, filled in with some decorative rocks (99p for a big jar full of silver rocks) and flock to texture the top surfaces.

When the glue was dry, I doused it with GW's Purity Seal to keep all the bits in place.  Well, it hasn't been much good for anything else yet, so I was glad to actually get some out of the can. And it needs it, too, because there's everything from small rocks to ground coffee on this thing.

Next, I sprayed it all black and white.  The black bits will just be washed and dry-brushed, but the white bits will be painted grass green.